DocumentationBlogSupport
Log inSign up
Log inSign up
BlogSupport
Build
Getting StartedPlatform Introduction
Embedded Apps
What's NewOverviewDeveloper GuideSidebar API Quick StartSubmission Checklist for Embedded Apps
Design Guidelines
MessagingMeetingsDevicesSidebarSidebar on Mobile
API Reference
BotsButtons and CardsIntegrationsBYODSService AppsService App GuestsService Apps G2GGuest IssuerWidgetsWebex ConnectLogin with WebexInstant ConnectInstant Connect Meeting LinksDeveloper SandboxBeta ProgramSubmit Your AppSupport PolicyFAQs
APIs
API Behavior ChangesPartners API GuideXML API DeprecationAccess the APIREST API BasicsCompliance
Webex APIs
Reference
Data Sources
Admin
OverviewAdmin APIsHybrid ServicesAuthentication
Guides
Hybrid ServicesWebhooksReal-time File DLP BasicsProvisioning APIsBackground ImagesAudit Events Error Reference
Reference
Admin Audit EventsAuthorizationsEventsGroupsHistorical AnalyticsHybrid ClustersHybrid ConnectorsLicensesMeeting QualitiesOrganization ContactsOrganizationsPartner ManagementPartner Reports/TemplatesPartner TagsPeopleRecording ReportRecordingsReport TemplatesReportsResource Group MembershipsResource GroupsRolesSecurity Audit EventsSession TypesSettingsSpace ClassificationsTracking CodesWorkspace LocationsWorkspace Metrics
Webex Calling Beta
Overview
Guides
Integrations and AuthorizationMetadata and Samples
Webex Calling
OverviewSDKs and ToolsWhat's New
Guides
Integrations and AuthorizationProvisioning APIsMetadata and SamplesBackground Images
Reference
Call ControlsCall RoutingCall Settings For MeCalling Service SettingsClient Call SettingsConference ControlsConverged RecordingsDECT Devices SettingsDevice Call SettingsDevicesEmergency Services SettingsFeatures: Announcement PlaylistFeatures: Announcement RepositoryFeatures: Auto AttendantFeatures: Call ParkFeatures: Call PickupFeatures: Call QueueFeatures: Call RecordingFeatures: Customer Experience EssentialsFeatures: Hunt GroupFeatures: Operating ModesFeatures: Paging GroupFeatures: Single Number ReachLocation Call SettingsLocation Call Settings: Call HandlingLocation Call Settings: SchedulesLocation Call Settings: VoicemailLocationsNumbersPSTNPartner Reports/TemplatesPeopleRecording ReportReportsReports: Detailed Call HistorySend Activation EmailUser Call SettingsVirtual Line Call SettingsWorkspace Call SettingsWorkspaces
Webex for Broadworks
Overview
Guides
Integrations and AuthorizationDeveloper's Guide
Reference
BroadWorks Billing ReportsBroadWorks EnterprisesBroadWorks SubscribersBroadWorks Workspaces
Webex for Wholesale
Overview
Guides
Developer's Guide
Reference
Wholesale Billing ReportsWholesale Provisioning
Webex for UCM
Guides
Integrations and Authorization
Reference
UCM Profile
Contact Center
Overview
Reference
Data Sources
Customer Journey Data
Overview
Guides
Getting StartedFAQ
Devices
Overview
Guides
Devices
Reference
Device Call SettingsDevice ConfigurationsDevicesWorkspace LocationsWorkspace MetricsWorkspace PersonalizationWorkspacesxAPI
Directory Services
Reference
Domain ManagementIdentity Organization
Meetings
Overview
Guides
Integrations and AuthorizationWebhooksWebinar GuideMeeting Resource Guide
Reference
Meeting ChatsMeeting Closed CaptionsMeeting InviteesMeeting MessagesMeeting ParticipantsMeeting PollsMeeting PreferencesMeeting Q and AMeeting QualitiesMeeting TranscriptsMeetingsMeetings Summary ReportPeopleRecording ReportRecordingsSession TypesTracking CodesVideo MeshWebhooks
Messaging
Overview
Guides
BotsIntegrations and AuthorizationWebhooksButtons and Cards
Reference
Attachment ActionsEventsMembershipsMessagesPeopleRoom TabsRoomsTeam MembershipsTeamsWebhooks
SCIM 2
Overview
Reference
SCIM 2 BulkSCIM 2 GroupsSCIM 2 Users
Workspace Integrations
OverviewTechnical DetailsControl Hub Features
Webex Status API
Full API Reference
Admin Audit EventsAttachment ActionsAuthorizationsBroadWorks Billing ReportsBroadWorks EnterprisesBroadWorks SubscribersBroadWorks WorkspacesCall ControlsCall RoutingCall Settings For MeCalling Service SettingsClient Call SettingsConference ControlsConverged RecordingsDECT Devices SettingsData SourcesDevice Call SettingsDevice ConfigurationsDevicesDomain ManagementEmergency Services SettingsEventsFeatures: Announcement PlaylistFeatures: Announcement RepositoryFeatures: Auto AttendantFeatures: Call ParkFeatures: Call PickupFeatures: Call QueueFeatures: Call RecordingFeatures: Customer Experience EssentialsFeatures: Hunt GroupFeatures: Operating ModesFeatures: Paging GroupFeatures: Single Number ReachGroupsGuests ManagementHistorical AnalyticsHybrid ClustersHybrid ConnectorsIdentity OrganizationIssuesLicensesLocation Call SettingsLocation Call Settings: Call HandlingLocation Call Settings: SchedulesLocation Call Settings: VoicemailLocationsMeeting ChatsMeeting Closed CaptionsMeeting InviteesMeeting MessagesMeeting ParticipantsMeeting PollsMeeting PreferencesMeeting Q and AMeeting QualitiesMeeting TranscriptsMeetingsMeetings Summary ReportMembershipsMessagesNumbersOrganization ContactsOrganizationsPSTNPartner ManagementPartner Reports/TemplatesPartner TagsPeopleRecording ReportRecordingsReport TemplatesReportsReports: Detailed Call HistoryResource Group MembershipsResource GroupsRolesRoom TabsRoomsSCIM 2 BulkSCIM 2 GroupsSCIM 2 UsersSecurity Audit EventsSend Activation EmailSession TypesSettingsSiteSpace ClassificationsTeam MembershipsTeamsTracking CodesUCM ProfileUser Call SettingsVideo MeshVirtual Line Call SettingsWebhooksWholesale Billing ReportsWholesale ProvisioningWorkspace Call SettingsWorkspace LocationsWorkspace MetricsWorkspace PersonalizationWorkspacesxAPI
API Changelog
SDKs
Space Meetings Migration
Calling
Introduction
Platform
Web
IntroductionQuickstart
Basics
AuthorizationCore ConceptsCalls
Advanced Features
Call SettingsContactsSupplementary ServicesVoicemailBackground Noise Reduction
Kitchen Sink
Meetings
Introduction
Platform
Web
IntroductionQuickstart
Basics
AuthorizationJoin a MeetingMigration To Improved MeetingsPasswords & CaptchasUnified Space Meetings
Advanced Features
Advanced ControlsDialing In and OutStreams & EffectsVideo Resolution
Multistream
Multistream Comprehensive GuideMultistream Quickstart
Migrating SDK V2 to V3
iOSAndroidBrowserNode.jsClick to Call
Developer CommunityCertifications

Run an OAuth Integration

Run a Webex OAuth Integration Locally

This tutorial shows you how to get a Node.js server running locally that acts as an OAuth client for a Webex integration, obtain an API access token for the authenticating user, and uses it to call a Webex API to get information about the user.

anchorOverview

anchor

This tutorial shows you how to get a Node.js server running locally that acts as an OAuth client for a Webex integration using a existing application built with Node.js and Express. The app presents a button for the user to start the OAuth flow. After the user has authenticated with Webex and accepted the requested data scopes they are redirected back to the Node.js app. The app obtains an API access token for the authenticated user from Webex and uses it to call the Get My Own Details endpoint. The user's display name is parsed from the response and displayed on the rendered HTML page. As next steps, suggestions are made for creating a new page that lists the user's spaces.

Overview

The Node.js application uses Express to define HTTP routes and embedded JavaScript templates (EJS) to compile and render HTML pages that contain data returned by the Webex API, such as the user's display name. HTTP calls to the Webex API are made using the node-fetch package from NPM.

anchorPrerequisites

anchor

To complete this tutorial you will need the following:

  • A Webex account. You can create a free account if you don't have one.
  • Git installed locally.
  • Node.js installed locally.

anchorStep 1: Create the Integration

anchor

First you'll create a Webex Integration, which represents an OAuth client. An OAuth client ID and secret is generated that you'll use to configure the Node.js app. You also specify the redirect URL where the user is sent after they authenticate with Webex and accept the requested data access scopes. In this case the redirect URL is set to http://localhost:8080 where the Node.js server will be listening for requests from the Webex OAuth server.

To create the Webex integration:

  1. Open the New Integration page on the Developer Portal (you must be signed in).

  2. Enter a name and description and select (or upload) an app icon.

    The integration's name and icon are displayed on the OAuth consent page where the authenticated user accepts (or denies) your app's request for the requested data scopes. The description is only used if or when you publish your integration to Webex AppHub.

  3. For Redirect URL enter http://localhost:8080/oauth.

    Redirect URI

    This is where the local Node.js app will be listening for requests.

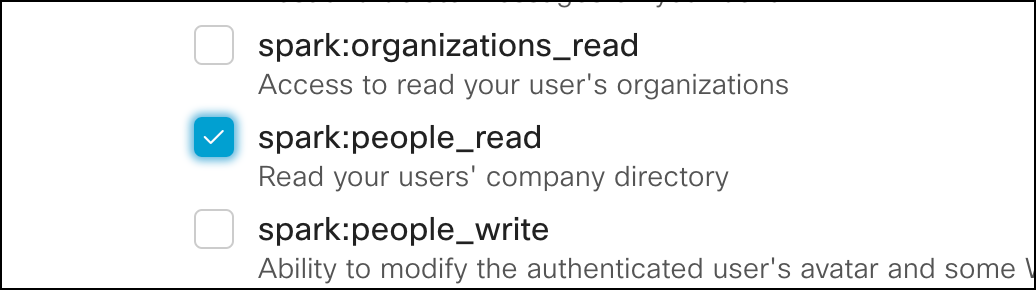
  4. In the Scopes section select the spark:people_read scope.

    Scopes

  5. Click Add Integration.

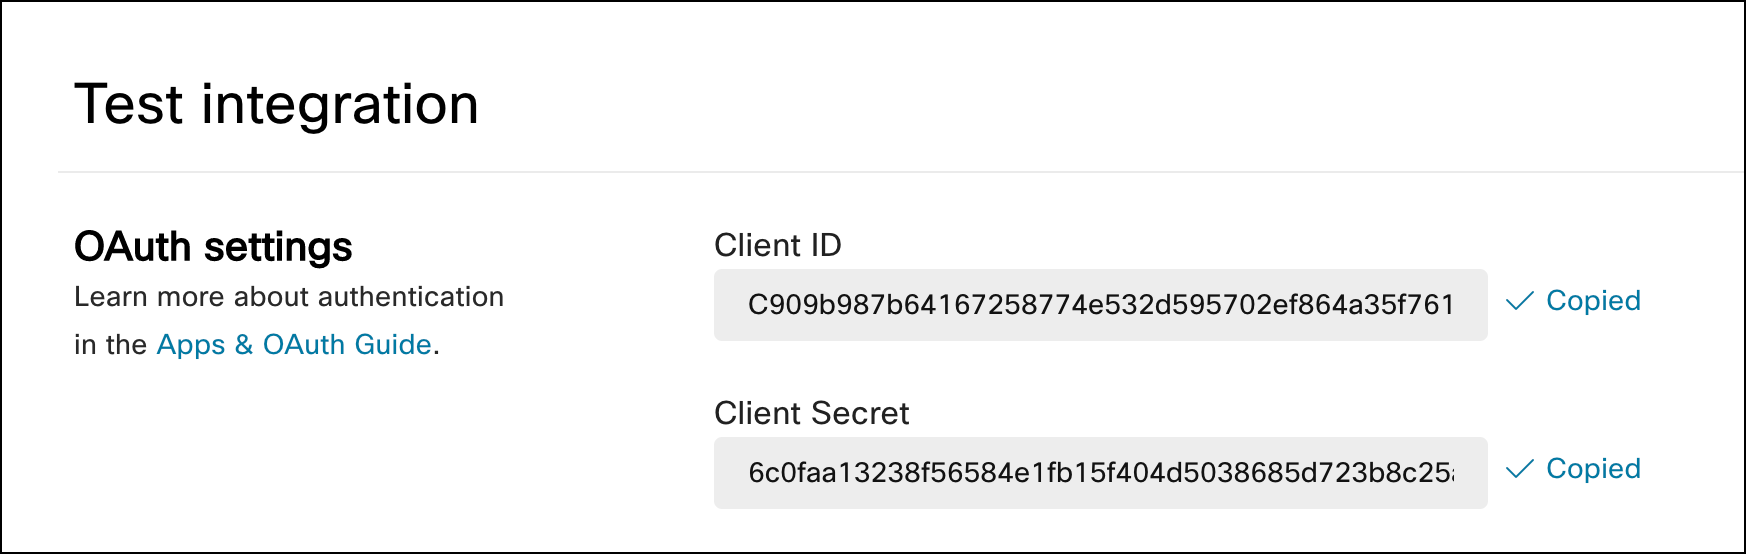
  6. Copy the your integration's generated Client ID and Client Secret for use in the next step.

    Client ID and secret

  7. Copy the OAuth Authorization URL string for use in the next step.

    OAuth authorization URL

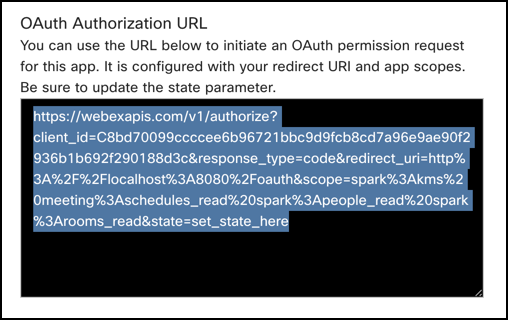
    This string contains URL-encoded values for the integration's requested scopes, client ID, redirect URL and state. The Node.js app will compute a new state query parameter value and add it to the URL.

    You could instead compose this URL in code, but typically the URL won't change much once your integration. This way you can't accidentally forget about including a selected scope.

anchorStep 2: Configure and Run the OAuth Server

anchor

To install the server locally you clone an existing Webex OAuth sample and install the project's dependencies. You also configure the app's .env file with the OAuth's client secret and authorization URL copied from the integration's settings page.

To run the server locally:

  1. Clone the OAuth sample project and install its dependencies.

    git clone https://github.com/WebexSamples/webex-oauth-integration.git
    cd webex-integration-sample
    npm install
    
  2. Open the project's .env file and paste your integration's client secret and initial authorization URL that you copied from the integration's configuration page.

    • Add your client ID and secret to the corresponding environment variables.
    # Your OAuth integration's client ID/secret
    CLIENT_SECRET=<INTEGRATION CLIENT SECRET>
    
    # Initial authorization URL
    AUTH_INIT_URL=<AUTH URL>
    
  3. Save your changes to the server.js and .env files and start the server from a terminal.

    node server.js
    

    The output shows the OAuth client's configuration.

    Debugger attached.
    oauth OAuth integration settings:
    oauth    - CLIENT_ID    : C909b987b64167258774e532d595702ef864a35f7614678dbe4046056daf67d63
    oauth    - REDIRECT_URI : http://localhost:8080/oauth
    oauth    - SCOPES       : spark:people_read +0ms
    Webex OAuth Integration started on http://localhost:8080
    

anchorStep 3: Test the Integration

anchor

Next you'll test the integration by initiating the OAuth flow from your browser, signing in to your Webex account and accepting the requested data scopes on the consent screen.

To test the integration:

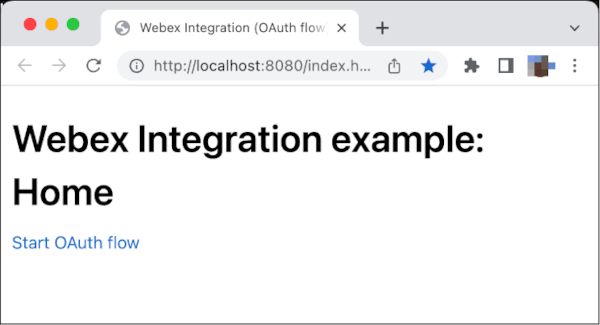
  1. Open http://localhost:8080 and click Start OAuth Flow.

    Start flow

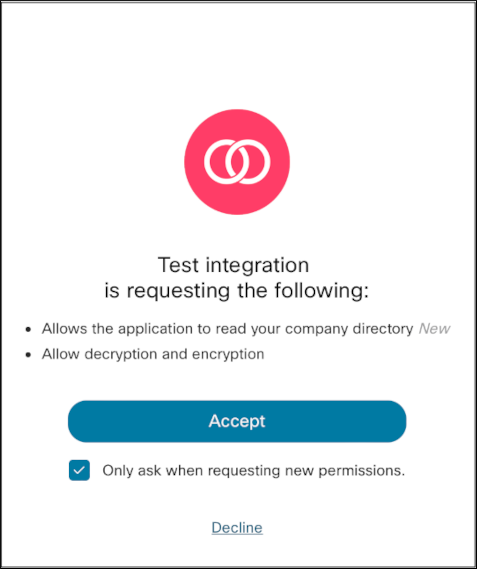
  2. Sign in to your Webex account, if prompted, and click Accept on the consent page.

    Consent screen

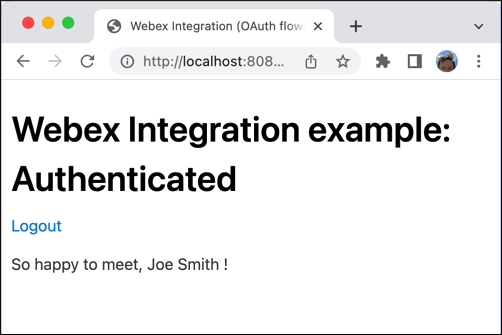
    Your browser is redirected to the integration's redirect URI, where the Node.js app exchanges the authorization code returned by Webex for an API access token, and stores the token as a session variable. The server then uses the access token to call the Get My Own Details endpoint, which returns details about the authenticated user. The server parses out the user's display name from the response and returns it in a compiled EJS template.

    Authenticated

anchorStep 4: List the User's Spaces

anchor

Next you'll add a new scope to your integration that will allow your app to get a list of Webex spaces (called "rooms" in the API) the user has recently visited, and modify the Node app to let the user view a list of their spaces.

To list the user's spaces:

  1. Update your Webex integration to include the spark:rooms_read data scope.

  2. Save your changes to the integration and copy the new authorization URI paste it into the project's .env file for the AUTH_INIT_URL variable, as before. This URL contains the newly added scope.

  3. In the Node project uncomment the following line in www/display-name.ejs. An Express route for this path is pre-defined in server.js.

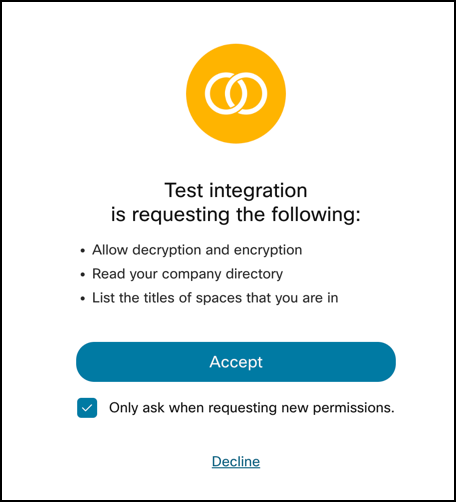
    <a href="/listrooms">List my rooms (spaces)</a>
    
  4. Restart the Node.js application and repeat the login and consent process. Note that the consent screen asks for an additional scope ("List titles of spaces that you are in").

    New scope consent screen

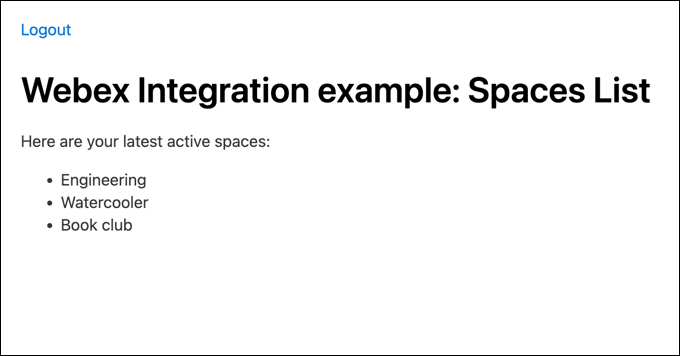
  5. On the greeting page click List my Rooms to display a list of your recently visited rooms.

    List of rooms

In This Article
  • Overview
  • Prerequisites
  • Step 1: Create the Integration
  • Step 2: Configure and Run the OAuth Server
  • Step 3: Test the Integration
  • Step 4: List the User's Spaces

Connect

Support

Developer Community

Developer Events

Contact Sales

Handy Links

Webex Ambassadors

Webex App Hub

Resources

Open Source Bot Starter Kits

Download Webex

DevNet Learning Labs

Terms of Service

Privacy Policy

Cookie Policy

Trademarks

© 2025 Cisco and/or its affiliates. All rights reserved.