Webex Admin
Using Webex Service Apps
Decouple your most important business processes from individual user life cycles.
Service apps enable you to request admin permission to use Webex REST APIs, reducing dependence on a single user's authorization and mitigating any associated risks to your app. Instead, the actor for the API calls is a powerful machine account provisioned in the customer's org, ensuring your business automation flows will continue to run smoothly.

Service Apps are often used for mission-critical business processes including:
- End to end provisioning of users
- Reporting dashboards for critical quality analysis
- Meeting scheduling systems
- Onboard new Webex calling users
- As part of BYODS Bring your own Datasource
- … and much more.
Common to such apps is that they must run continually and be independent of any single user account. In contrast, for standard Integrations, if the authorizing user leaves the company or changes passwords, the Integration may break. In addition, unlike standard Integrations, Service Apps usually request data for many users and the whole org rather than on behalf of a single user.
Service Apps do share many similarities with Integrations. The industry standard OAuth 2.0 protocol underpins both. OAuth client creation, scope selection, and authorization are happening just as they do for Integrations; however, those flows are mostly abstracted in a GUI experience for both the developer and the admins.
Two distinct personas are involved in putting a Service App into service: the developer and the full admin. Both of those workflows are described below.
anchorService App Creation: Developer Flow
anchorAs a developer, to create your Service App you need to do the following:
- Register your Service App with Webex.
- Optionally, register a webhook for your Service App authorization.
- Request admins’ authorization (must be a Full Admin).
- Retrieve the access and the refresh token.
- Use the access token to make your API calls.
Register your Service App
As a developer, you primarily work in the Webex Developer Portal. Registering your Service App with Webex is easy:
- Login to the Developer Portal and select My Webex Apps from the menu under your avatar.
- At the top of the page, click Create a New App and then Create a Service App to start the wizard.
You'll need to provide basic information, like your service app’s name, description, and logo. This information should be user-facing since admins will see it on the Control Hub’s management page. You also need to select the scopes for your Service App. For more information on scopes, please see the Integrations app page.
Analytics and XSI scopes do not currently work with Service Apps, nor can they manage organization contacts. Meeting scopes have limited functionality, mostly in support of adminOnBehalf functions where a hostEmail must be provided. Also, note there is a limit on the number of scopes that can be selected. This is a string limit, and the scope list is limited to around 880 characters. We ask you to carefully select these scopes. Service Apps are very powerful, and admins will be reluctant to approve too much power to these Service Apps.
If the Service App requests Compliance Officer scopes as indicated by the spark-compliance:* prefix, the Service App must be authorized in Control Hub by a Full Admin who also has the Compliance Officer role. If you see an error "Your changes were not updated. The request was unauthorized." you most likely are not a Compliance Officer, but the app needs compliance scopes to work. For questions on this restriction, please email devsupport@webex.com.
When a Service App works with the Join a Meeting API, the hostEmail must be provided. Otherwise, the API cannot work.
After successful registration, you will be taken to a different page containing your integration's newly created Client ID and Client Secret. The same client secret will be shown once only, so copy it and keep it safe! So far, all you have done is create an OAuth client. That’s why this process likely feels very familiar. It is the same for the Integrations app type.
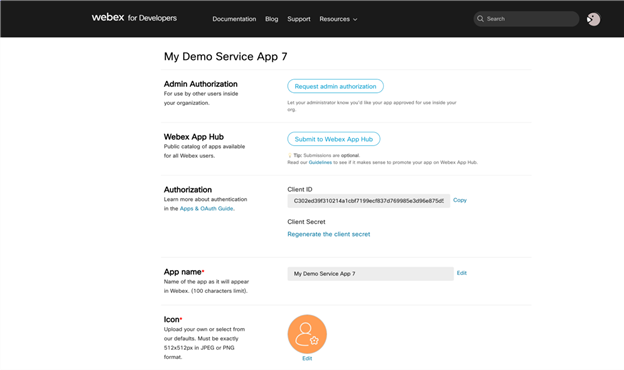
Things start deviating from Integrations in the top two sections on the Service App details page: Admin Authorization and Webex App Hub submissions. To understand those sections, we must first dive into the application visibility for Service Apps, which differs slightly from Integrations. When you create your Service App, initially its visibility is private. That means only you can authorize it if you also happen to be a full admin. If you are a regular user and need an admin’s help, you must follow a different process.
Register a webhook for your Service App
This is an optional step that avoids the need to regularly and manually check your Service App authorizations in the developer portal. Instead, you can register a webhook that will fire whenever one of your Service Apps is authorized or deauthorized. You have to register your webhook with the resource serviceApp and events of either authorized or deauthorized. Then, when an admin authorizes your Service App, you will receive a webhook. The webhook includes the authorizing’s org orgId, which you can use later to retrieve the access and refresh token pair.
Request Authorization of a Service App Within the Developer's Org
To request authorization in your own org, click Request Admin Authorization. This action makes your Service App visible in your org’s administrative tool (Control Hub), where a Full Admin can then authorize it. If you are working in a free org (usually an unpaid account), you should request a sandbox, where you can create an admin to do the authorization.
Request Authorization of a Service App in a Non-affiliated Org
To request authorization in an org that is not your own org, you need to Submit to Webex AppHub. When you do that, a manual review of your Service App with the App Hub team is initiated. You must fill in additional information including how the App Hub team can test your app, which vertical you serve, descriptions and tags shown on App Hub, landing and support pages, videos, and more. You can find more information in this supporting blog.
Retrieve the Access and Refresh Token Pair
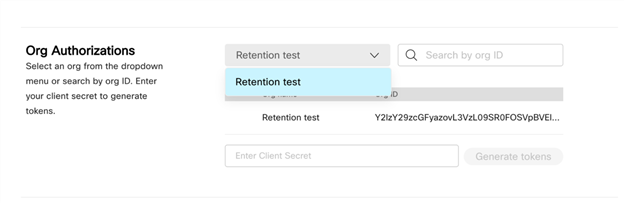
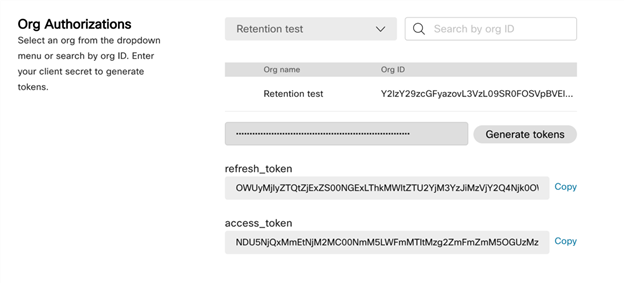
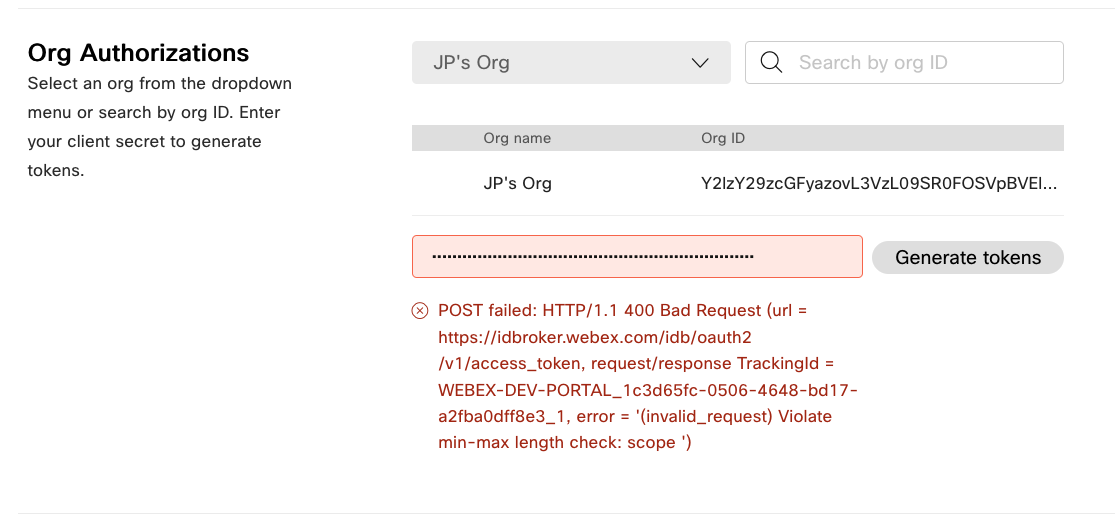
After your Service App is authorized, you can retrieve the access and refresh token. You use them as you do for Integrations and the same token expiration policies apply; typically 14 days for the access token and 90 days for the refresh token. To get the token pair, go to the Org Authorizations section on your Service Apps details page. There is a drop-down list for all the orgs that authorized your Service App. You can also search by Org Id if you know the org ID and have many authorizations.
Searching by name is not currently supported. To perform an OrgID search, you must first base64 encode the OrgID like this: ciscospark://us/ORGANIZATION/OrgID. The result will be a searchable OrgID format which starts with Y2 that the search box will recognize. Base64 encoded example (remove all trailing equal signs before searching): Y2lzY29zcGFyazovL...C0xMjM0NTY3ODkwMQ==
Once you have identified and selected the new org’s authorization, you can copy your client secret into the provided field and retrieve and copy the access and refresh tokens for the org. If you didn’t store the client's secret previously, you can regenerate it.
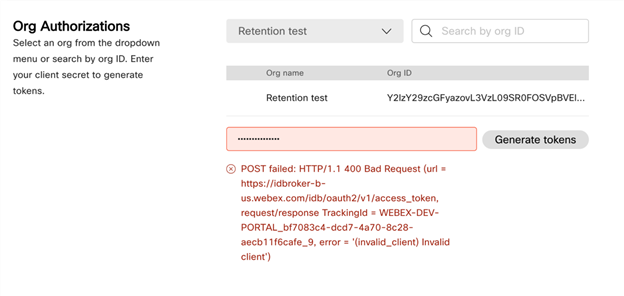
If you see an error like the following, your secret wasn’t copied correctly to the clipboard. Manually select it from the field and try again.
If, on the other hand, you selected too many scopes, you will see this error message. There is no strict limit on the number of scopes. Instead, a character limit for all scopes combined, around 800, is being enforced. We ask you to carefully select your scopes, as admins will be reluctant to approve apps with scopes they think are unnecessary.
Token retrieval via API
Alternatively, you can call the API to retrieve your token pair. You do this by making an HTTP POST to your applications token endpoint (/applications/{appId}/token) with your Personal Access Token or an integration with the scope spark:applications_token as Bearer while supplying the clientId, clientSecret, and targetOrgId as application/json request body.
If you do not want to use the portal as is desired by some automation systems, you can call the API to retrieve your token pair. You do this by making a HTTP POST to the token endpoint with your Personal Access Token or the token from a separate regular integration with the scope spark:applications_token as Bearer while supplying the clientId, clientSecret, and targetOrgId as application/json request body.
POST -H “Authorization: Bearer {token}” -H “Content-type: application/json” https: //webexapis.com/v1/applications/
Y2lzY29zcGFyazovL3VzL0FQUExJQ0FUSU9OL0M1OYzOWVkMGMxMzhlNTFmNDZjOTI3ZDExNzAyMDY4/token -d ‘{"clientId":"C595e0eaa94a8b907579644b4ab1c7c511a7639ed0c138e51f46c927d11702068","clientSecret":"d5c127a9e4bf6007b9cd5c127a9e4bf6007b9c","targetOrgId":"Y2lzY29zcGFyazovL3VzL09SR0FOSVpBVElPTi9jZTg2MWZiYS02ZTJmLTQ5ZjktOWE4NC1iMzU0MDA4ZmFjOWU”}’
Use the Access and Refresh Tokens to Make API Calls on Behalf of the Machine Account
How you use the access token to call the Webex APIs and the refresh token to keep the access token fresh is well documented on the Integrations app page.
anchorService App Creation: Admin Flow
anchorYou have the following responsibilities as an admin who wants to use a Service App:
- Be a Full Admin (read-only, device admins, etc., are insufficient).
- Understand the purpose of the Service App, the developer's background, the scopes you are authorizing, and how your organization will use it.
- Authorize the Service App for use in your org.
Full Admin Authorization of a Service App
To authorize a service app:
- Log in to your organization's Control Hub (https://admin.webex.com).
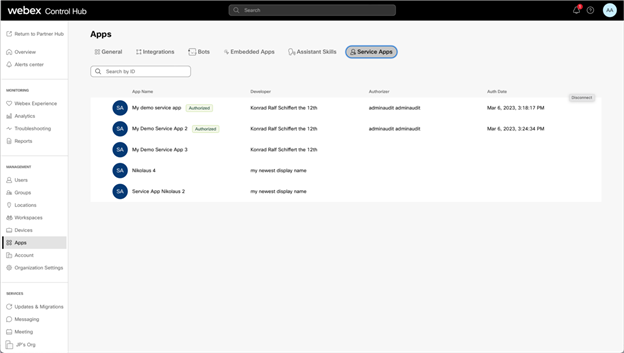
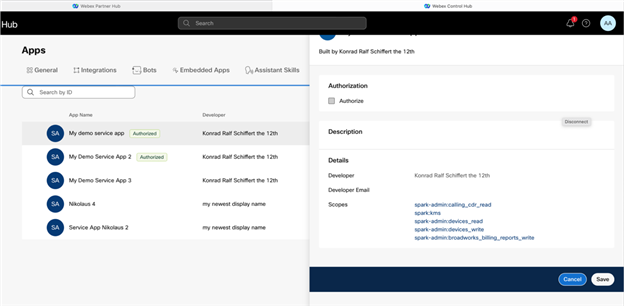
- Find the Service App you want to authorize. Service Apps can be found under Management > Apps > Service Apps. If you cannot see the Service App in question, you need to ask the developer to have them submit for Admin Authorization or App Hub submission You can click the Service App and will see the service app’s description, developer info, and requested scopes.
- When ready to authorize the Service App, click Authorize followed by Save. Your name is shown as the authorizing user in Control Hub. An entry in AdminAudit events is also created, documenting who authorized the Service App.
- Optionally, you may also wish to inform the developer that you have authorized their Service App.
anchorDeauthorizing a Service App
anchorAny full admin in Control Hub can deauthorize a Service App. This often happens because an app is no longer needed or because of security concerns.
To deauthorize a Service App:
- Go to Management > Apps > Service Apps and highlight the Service App. Uncheck the authorized checkbox and then click Save.
- The machine account created during authorization is deleted, and the tokens are invalidated.
If you registered a deauthorization webhook for your Service Apps, you will be informed of the administrative action via this mechanism.